
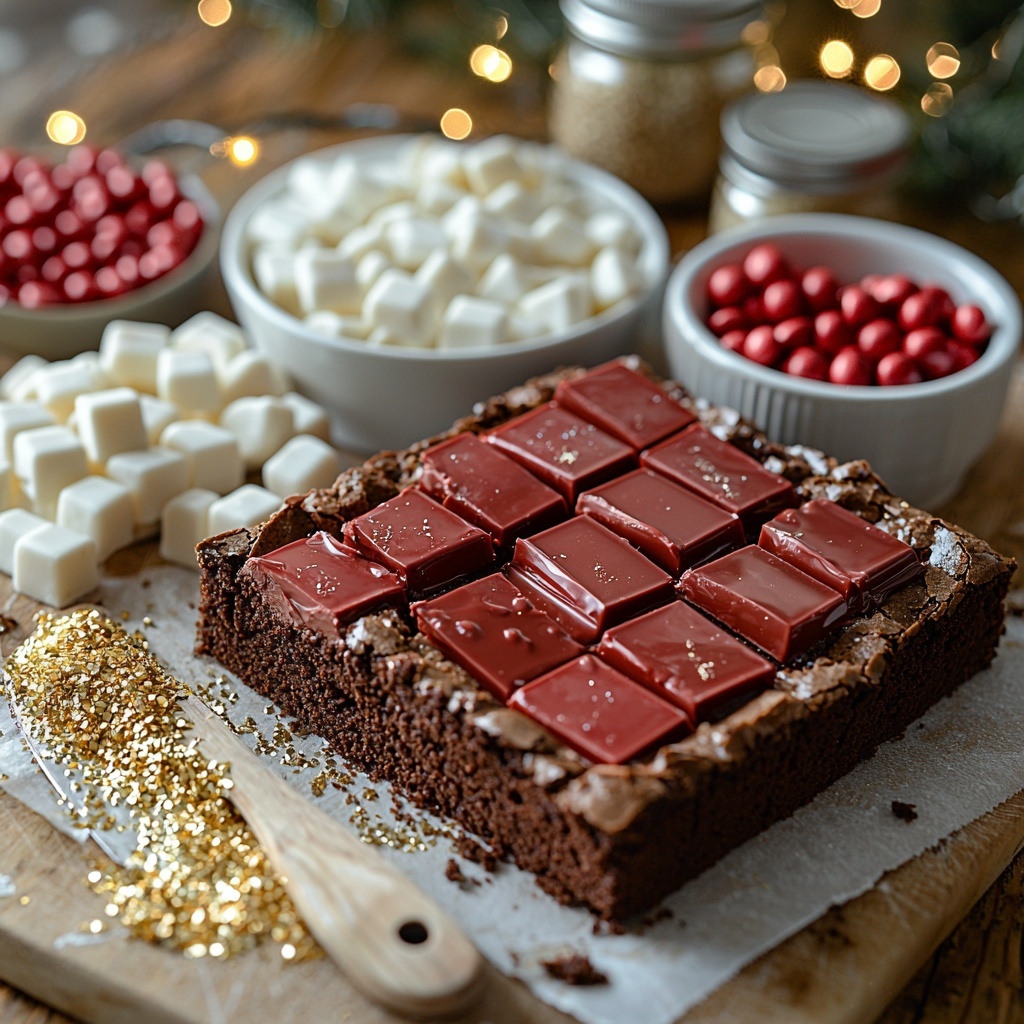
If you’re looking to add a playful and festive twist to your dessert table this holiday season, the Santa Belly Brownies Recipe is exactly what you need. Imagine rich, fudgy brownies topped with a glossy, vibrant red ganache that mimics Santa’s iconic suit, complete with a shiny gold buckle and a sprinkle of white chocolate buttons as snowy embellishments. It’s a delightful treat that’s not only visually stunning but also irresistibly delicious, making it the perfect centerpiece for holiday gatherings or a cozy night in with loved ones.
Ingredients You’ll Need
These ingredients are straightforward, yet each one plays a special role in creating the magic of Santa Belly Brownies. From the fudgy brownie base to the luscious red ganache and shimmering gold accents, every component works together to deliver taste, texture, and festive flair.
- Brownie base: Choose your favorite boxed mix or homemade recipe to create a rich, chocolatey foundation.
- 2 cups red candy melts: These provide the vibrant red color for Santa’s suit; alternatively, white chocolate chips paired with red oil-based food coloring work perfectly.
- 1/2 cup heavy cream: Adds creaminess to the ganache, ensuring a silky smooth texture.
- 1/2 cup white chocolate chips or white M&Ms: These act as cheerful buttons on Santa’s belly, adding texture and sweetness.
- 12 mini chocolate squares: These become the shiny gold buckles that bring the whole look together.
- 1/2 teaspoon edible gold luster dust or edible gold spray: Used to give the buckles that festive, eye-catching sheen.
- 1 teaspoon corn syrup or edible glue: Optional, for sticking decorations firmly in place.
How to Make Santa Belly Brownies Recipe
Step 1: Bake the Brownie Base
Start by preparing your brownies, using either your favorite boxed mix or a tried-and-true homemade recipe. Pour the batter into a 9×13-inch pan lined with parchment paper for easy removal. Once baked, let the brownies cool completely—this ensures the ganache will set properly without melting into the base.
Step 2: Make the Red Ganache
In a microwave-safe bowl, combine the red candy melts with heavy cream. Heat in 30-second intervals, stirring after each to achieve a smooth, glossy ganache that will beautifully coat the brownies and mimic Santa’s vibrant red jacket with a luscious finish.
Step 3: Spread the Ganache
Using an offset spatula, gently spread the red ganache over your cooled brownies. The smooth layer creates a striking contrast against the dark chocolate beneath. Pop the tray into the fridge for 10 to 15 minutes to let the topping set just enough for the next step.
Step 4: Cut into Even Squares
Once the ganache is slightly firm but still soft to the touch, use a clean and sharp knife to slice the brownies into 12 even squares. This attention to neatness sets the stage for precise decoration and makes each piece look as delightful as it tastes.
Step 5: Add the Gold Buckles
Brush each mini chocolate square with edible gold luster dust or spray them to create those shiny buckles reminiscent of Santa’s belt. Place one buckle in the center of every brownie square—it’s the detail that truly brings this Santa Belly Brownies Recipe to life.
Step 6: Attach the White Buttons
Arrange 2 to 3 white chocolate chips or white M&Ms above each gold buckle, representing the buttons on Santa’s coat. If needed, use a touch of corn syrup or edible glue to keep these charming little accents firmly in place.
Step 7: Chill Before Serving
Finally, refrigerate the decorated brownies for another 10 minutes to let everything set wonderfully. This step not only helps maintain their shape but also ensures the decorations stay perfectly intact when you serve these festive bites.
How to Serve Santa Belly Brownies Recipe
Garnishes
For a little extra sparkle, dust the finished brownies with a pinch of powdered sugar or a light layer of edible glitter. A sprig of fresh mint or holly placed nearby can add a nice seasonal touch when serving to guests.
Side Dishes
These brownies pair beautifully with a cup of rich hot cocoa or a glass of creamy eggnog. For a lighter counterbalance, offer a bowl of fresh berries—strawberries or raspberries bring a fresh tartness that complements the rich chocolate perfectly.
Creative Ways to Present
Try arranging your Santa Belly Brownies Recipe on a festive platter lined with red and white striped paper or a bed of evergreen sprigs to enhance the holiday vibe. For party settings, individual clear boxes tied with red ribbons make charming edible gifts that everyone will adore.
Make Ahead and Storage
Storing Leftovers
Store leftover brownies in an airtight container at room temperature for up to two days if your kitchen is cool. If your home tends to be warm, refrigeration is best to keep the ganache firm and the decorations intact.
Freezing
You can freeze the brownies before decoration by wrapping them tightly in plastic wrap and foil. After decorating, freezing is less ideal as the ganache and decorative elements may lose their texture, but freezing undecorated brownies ensures you have a quick treat ready anytime.
Reheating
For serving, bring refrigerated or frozen brownies to room temperature naturally before enjoying. Avoid microwaving as it might melt the ganache and cause the decorations to shift. Just a little patience preserves their festive beauty and taste.
FAQs
Can I make the red ganache without candy melts?
Absolutely! If you can’t find red candy melts, just use white chocolate chips with a few drops of oil-based red food coloring. This option gives you the same glossy, vibrant finish perfect for this Santa Belly Brownies Recipe.
What if I don’t have edible gold dust or spray?
If edible gold isn’t on hand, you can get creative with silver or even a sprinkle of colored sugar crystals. The goal is to mimic Santa’s shiny belt buckle, so feel free to improvise while keeping it food-safe.
Can these brownies be made gluten-free?
Yes! Just substitute the brownie base with your favorite gluten-free mix or homemade recipe. The rest of the toppings are naturally gluten-free, making this recipe very adaptable.
How far in advance can I prepare Santa Belly Brownies Recipe?
You can bake and cool the brownies a day ahead. The ganache and decorations are best applied on the day you plan to serve to ensure freshness and visual appeal, but if needed, they can be made a few hours before serving and stored in the fridge.
Is corn syrup necessary for the decorations?
Corn syrup or edible glue is optional but helpful for securing the white chocolate chips or M&Ms in place. If you don’t have it, gently pressing the pieces into the ganache before it fully sets often does the trick.
Final Thoughts
I truly can’t recommend this Santa Belly Brownies Recipe enough—it’s playful, festive, and downright delicious. Whether you’re baking for family, friends, or a holiday party, these brownies add that perfect touch of whimsy and warmth. Trust me, once you try them, they’ll become a beloved tradition that everyone looks forward to year after year!
Print
Santa Belly Brownies Recipe
- Prep Time: 15 minutes
- Cook Time: 30 minutes
- Total Time: 45 minutes
- Yield: 12 brownies
- Category: Dessert
- Method: Baking
- Cuisine: American
Description
These festive Santa Belly Brownies transform classic brownies into whimsical holiday treats with a vibrant red ganache topping, adorned with edible gold-dusted mini chocolate squares and white chocolate chips or M&Ms to mimic Santa’s iconic belt and buttons. Perfect for holiday parties and gifting, this recipe combines the rich, fudgy texture of brownies with an eye-catching decoration that’s both fun and delicious.
Ingredients
Brownie Base
- 1 batch brownies, baked and cooled (9×13-inch pan)
Red Ganache Topping
- 2 cups red candy melts (or 2 cups white chocolate chips + red oil-based food coloring)
- 1/2 cup heavy cream
Decorations
- 1/2 cup white chocolate chips or white M&Ms
- 12 mini chocolate squares
- 1/2 teaspoon edible gold luster dust or edible gold spray
- 1 teaspoon corn syrup or edible glue (optional, for sticking decorations)
Instructions
- Prepare Brownies: Prepare your brownie base from a boxed mix or a homemade recipe, baking it in a 9×13-inch pan lined with parchment paper. Once baked, allow the brownies to cool completely to ensure the ganache adheres properly.
- Make Red Ganache: In a microwave-safe bowl, combine the red candy melts and heavy cream. Heat in 30-second intervals, stirring after each, until the mixture is smooth and glossy to create a vibrant red ganache.
- Apply Ganache: Using an offset spatula, spread the red ganache evenly over the cooled brownies. Place the pan in the fridge and let the ganache set slightly for about 10 to 15 minutes until it firms up but remains soft enough to cut.
- Cut Brownies: Once the ganache topping has firmed but is still soft, use a clean, sharp knife to cut the brownies into 12 even squares for neat presentation.
- Prepare Decorations: Brush the mini chocolate squares with edible gold luster dust or spray to create a shiny buckle effect. Position one gold-dusted mini square in the center of each brownie square.
- Add Buttons: Press 2 to 3 white chocolate chips or white M&Ms just above the buckle on each brownie to mimic Santa’s buttons. If needed, use corn syrup or edible glue to secure the decorations in place.
- Set Decorations: Refrigerate the decorated brownies for another 10 minutes to allow all elements to set firmly before serving, ensuring they hold their festive shape.
Notes
- You can use either pre-made boxed brownie mix or your favorite homemade brownie recipe according to your preference.
- Red candy melts provide a vibrant color, but alternatively, you can use white chocolate chips with red oil-based food coloring to achieve the red ganache.
- If you don’t have edible gold luster dust, edible gold spray can be used to achieve a similar decorative effect.
- Corn syrup or edible glue is optional but helpful for securing decorations especially if the brownies will be transported.
- Store decorated brownies in the refrigerator to maintain the ganache’s firmness and freshness.
