
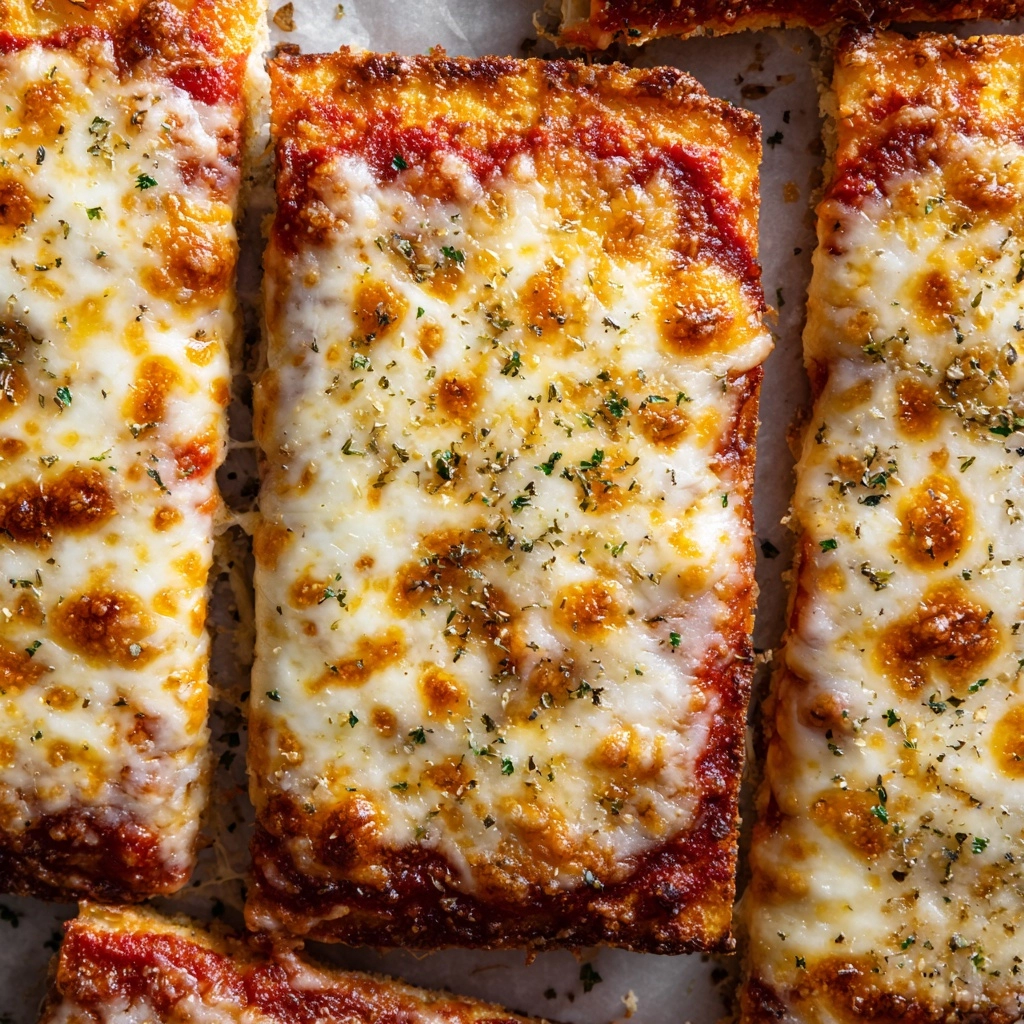
If you ever find yourself craving that perfect combination of gooey cheese, tangy pizza sauce, and a crispy golden crust, then you are going to adore this Homemade Easy Cheesy Pizza Pockets Recipe. It’s all about taking simple ingredients and turning them into bite-sized pockets of pure comfort that are as fun to make as they are to eat. Whether you’re looking for a quick snack, a family lunch, or something to impress at your next gathering, these pizza pockets bring all the classic pizza flavors wrapped up in a warm, flaky dough that’s just irresistible.
Ingredients You’ll Need
Each ingredient plays a crucial role in crafting these delightful pizza pockets, providing a harmony of flavors and textures that make every bite satisfying. From the dough’s tender crispiness to the melty cheese and perfectly seasoned fillings, these essentials come together effortlessly.
- Refrigerated pizza dough (or homemade): The foundation for your pockets, providing a soft yet crispy crust after baking.
- Pizza sauce: Adds tangy, rich tomato flavor that complements the cheese perfectly.
- Shredded mozzarella cheese: The gooey, melty heart of the pockets that pulls apart beautifully.
- Mini or chopped pepperoni: Brings a nice savory bite and a touch of spice.
- Italian seasoning: A fragrant blend that elevates the overall taste with herbs like oregano and basil.
- Olive oil: Adds a subtle richness and helps to achieve that gorgeous golden crust.
- Egg (for egg wash): Creates a shiny, appetizing finish on the baked pockets.
- Flour for dusting: Prevents sticking while rolling out the dough for easy handling.
- Optional fillings: Cooked sausage, mushrooms, bell peppers, or olives—these add variety and extra flavor.
How to Make Homemade Easy Cheesy Pizza Pockets Recipe
Step 1: Prepare Your Oven and Dough
Begin by preheating your oven to 400°F (200°C) and lining a baking sheet with parchment paper to ensure your pockets don’t stick and bake evenly. Then, lightly flour a clean countertop or surface before rolling out your pizza dough into a large rectangle about ¼ inch thick. This thickness is perfect for achieving that tender yet crisp crust that makes these pockets so delightful.
Step 2: Cut and Fill the Dough
Cut the rolled dough into 6 to 8 equal rectangles or squares, which will become your individual pockets. On one half of each piece, spread a generous spoonful of pizza sauce. Add a hearty sprinkle of shredded mozzarella cheese, followed by mini or chopped pepperoni, and any optional fillings you love. Don’t forget to sprinkle a little Italian seasoning on top to bring everything together with that classic pizza aroma.
Step 3: Seal the Pockets
Fold the dough over the filling to form a pocket shape, carefully pressing the edges together. To ensure your pockets stay sealed during baking, press down with the prongs of a fork all along the edges. This not only seals the filling inside but also creates a lovely decorative touch.
Step 4: Apply Egg Wash and Olive Oil
Transfer the pockets to your prepared baking sheet. In a small bowl, whisk one egg with a tablespoon of water to create an egg wash, then brush it over the tops of each pocket for that beautiful golden and glossy finish. A light brush of olive oil adds extra color and a satisfyingly crisp texture as they bake.
Step 5: Bake to Perfection
Bake your pizza pockets for 15 to 18 minutes until they turn golden brown and the cheese inside bubbles invitingly. Once baked, let them cool for a few minutes—it’s tough to wait, but this step helps the filling set slightly, so you avoid any fiery bites!
How to Serve Homemade Easy Cheesy Pizza Pockets Recipe

Garnishes
Topping your pockets with fresh basil leaves, a sprinkle of grated Parmesan, or a dash of crushed red pepper flakes adds a wonderful touch of freshness and a pop of color that elevates the presentation and taste. A side of marinara sauce or creamy ranch dressing makes dipping an absolute joy.
Side Dishes
These pockets pair beautifully with simple sides like a crisp green salad, roasted vegetables, or even some classic garlic bread. If you want to keep the meal light, a crunchy coleslaw or fresh cucumber salad balances the richness of the pizza pockets perfectly.
Creative Ways to Present
Serving these Homemade Easy Cheesy Pizza Pockets Recipe at a party? Arrange them on a wooden board with small dishes of dipping sauces around for easy sharing. You can also cut them into smaller bite-sized pieces for a charming appetizer platter, perfect for entertaining or cozy family nights.
Make Ahead and Storage
Storing Leftovers
If you find yourself with leftover pizza pockets, store them in an airtight container in the refrigerator for up to 3 days. This helps maintain their texture and keeps the flavors fresh, making for a perfect next-day snack or quick meal.
Freezing
One of the best things about this Homemade Easy Cheesy Pizza Pockets Recipe is how well they freeze. You can freeze the uncooked pockets on a parchment-lined tray until firm, then transfer to a freezer bag for up to 2 months. Alternatively, freeze baked pockets with parchment paper between layers to avoid sticking. This makes for a fantastic grab-and-bake option anytime.
Reheating
For the best results when reheating, pop your pizza pockets into a preheated oven at 350°F (175°C) for about 10 minutes or until warmed through and crispy again. An air fryer also does a wonderful job restoring that freshly baked texture—just heat for 3 to 5 minutes.
FAQs
Can I use homemade pizza dough instead of refrigerated dough?
Absolutely! Homemade pizza dough works wonderfully and lets you customize flavors and ingredients. Just ensure it’s rolled to about ¼ inch thick for best results in this recipe.
What are some good vegetarian filling options?
Great options include cooked mushrooms, sautéed bell peppers, olives, spinach, or artichoke hearts. These bring fresh textures and flavors while keeping the pockets meat-free.
Can I make these pizza pockets spicy?
Definitely! Add finely chopped jalapeños, crushed red pepper flakes, or use a spicy pizza sauce to give your pockets an extra kick.
How do I prevent the pockets from leaking filling?
Be careful not to overfill the dough, and make sure to firmly seal the edges with a fork. Egg wash also helps create a better seal when baking.
Are these pizza pockets freezer-friendly before or after baking?
Both! You can freeze them raw for baking later or bake and then freeze. Just thaw and reheat using an oven or air fryer for the best texture.
Final Thoughts
There’s something truly comforting about making and sharing the Homemade Easy Cheesy Pizza Pockets Recipe. It’s a little bit of joy wrapped up in crisp dough, brimming with the classic flavors we all love. These pockets are simple to make, endlessly customizable, and sure to become a favorite for your family and friends. So go ahead, turn your kitchen into a pizza pocket paradise—you won’t regret it!
Print
Homemade Easy Cheesy Pizza Pockets Recipe
- Prep Time: 15 minutes
- Cook Time: 18 minutes
- Total Time: 33 minutes
- Yield: 6–8 pizza pockets
- Category: Main Course, Snack
- Method: Baking
- Cuisine: American
- Diet: Vegetarian
Description
These homemade easy cheesy pizza pockets are a delicious and convenient snack or meal, featuring a crispy baked dough filled with gooey mozzarella, savory pepperoni, and flavorful Italian seasoning. Perfectly portioned and customizable with optional fillings like sausage, mushrooms, or bell peppers, they’re great fresh or reheated from frozen.
Ingredients
Dough and Base
- 1 package refrigerated pizza dough (or homemade)
- Flour for dusting
- 1 tablespoon olive oil
- 1 egg (for egg wash)
- 1 tablespoon water (for egg wash)
Fillings
- 1 cup pizza sauce
- 1 ½ cups shredded mozzarella cheese
- ½ cup mini pepperoni or chopped regular pepperoni
- 1 teaspoon Italian seasoning
- Optional: cooked sausage, mushrooms, bell peppers, or olives
Instructions
- Preheat Oven: Preheat your oven to 400°F (200°C) and line a baking sheet with parchment paper to prevent sticking and ensure easy cleanup.
- Prepare Dough: Lightly flour a clean surface and roll out the pizza dough into a large rectangle approximately ¼ inch thick to create the base for your pockets.
- Cut Dough: Cut the dough into 6 to 8 equal rectangles or squares, which will become individual pizza pockets.
- Add Fillings: On one half of each rectangle, spread a spoonful of pizza sauce, then layer with shredded mozzarella, pepperoni, and any additional optional fillings. Sprinkle Italian seasoning evenly on top for added flavor.
- Seal Pockets: Fold the dough over the filling to form a pocket and firmly press the edges together with a fork to seal and prevent leaking during baking.
- Prepare for Baking: Place the sealed pockets onto the prepared baking sheet. In a small bowl, whisk the egg with 1 tablespoon water to create an egg wash. Brush the tops of each pocket with the egg wash, then lightly brush with olive oil for extra color and crispiness.
- Bake: Bake in the preheated oven for 15–18 minutes, or until the pockets are golden brown and the cheese inside is bubbly and melted.
- Cool and Serve: Remove from oven and let the pizza pockets cool slightly before serving to prevent burns and allow flavors to settle.
Notes
- These pizza pockets can be frozen before or after baking for convenient future meals.
- Reheat baked pockets in the oven or air fryer to maintain a crispy texture.
- For variety, swap pepperoni with chopped veggies or cooked chicken.
- Serve with extra marinara sauce or ranch dressing for dipping.


