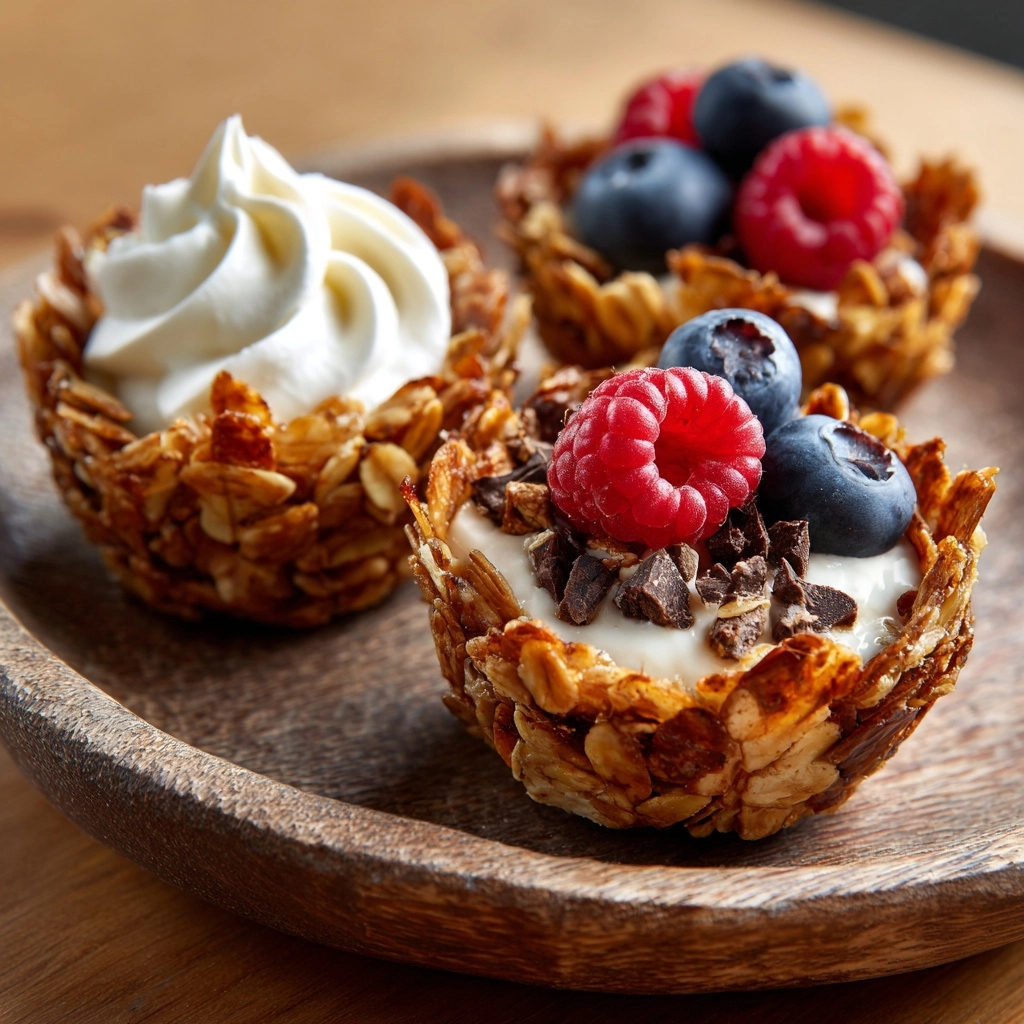
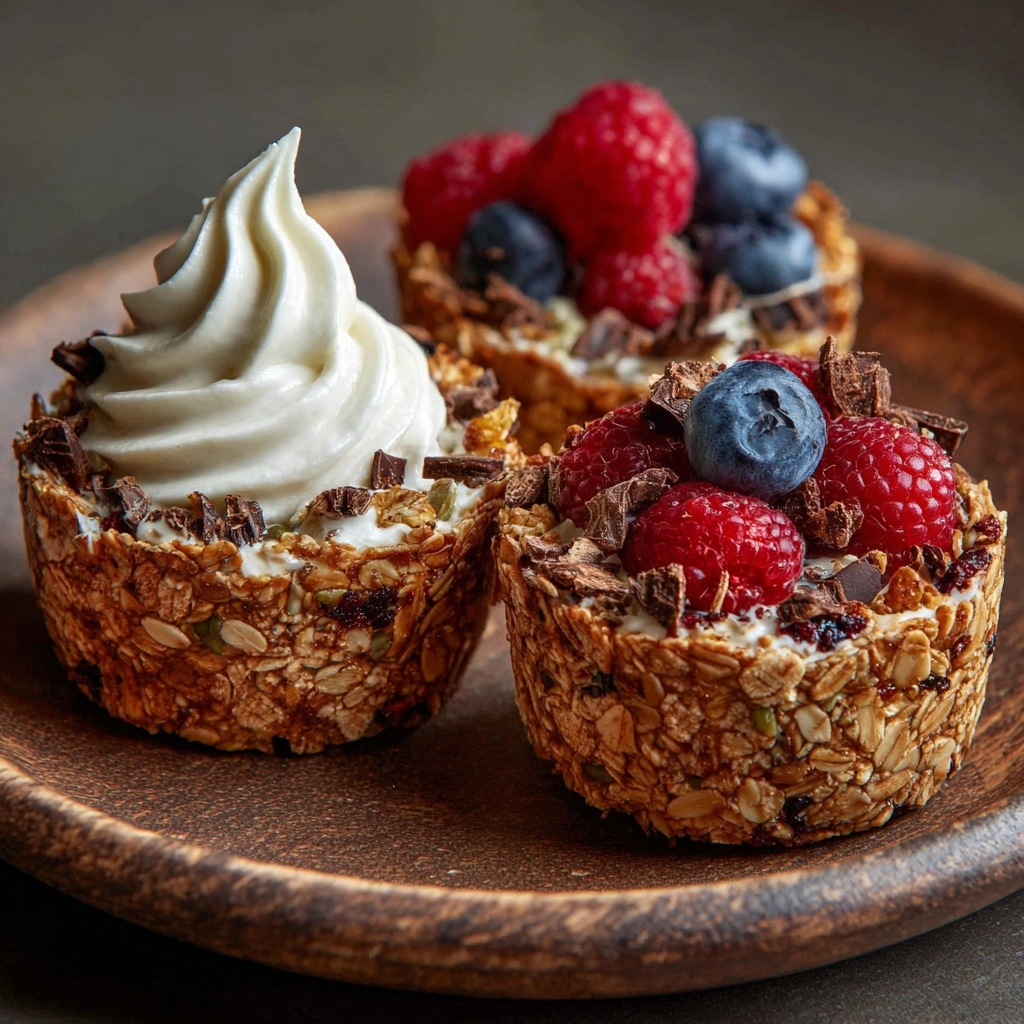
There is something truly delightful about starting your day with a treat that’s as wholesome as it is delicious, which is why I am absolutely in love with this Granola Cups with Greek Yogurt and Fresh Berries Recipe. Imagine crunchy, golden-baked cups filled with creamy Greek yogurt and bursting with juicy fresh berries—each bite is a harmony of textures and flavors that feels like a cozy morning hug. These granola cups are not only stunning on the table but also incredibly healthy, featuring naturally gluten-free oats combined with the richness of almond flour and the subtle sweetness of honey or maple syrup. Whether you’re whipping them up for a quick breakfast or a snack that feels indulgent yet nourishing, this recipe is a must-try for anyone who loves fresh, vibrant food with a satisfying crunch.
Ingredients You’ll Need
Gathering the right ingredients is the first step to creating these charming granola cups. The simplicity of each component ensures that every element shines, bringing the perfect balance of flavors, texture, and color to your creation.
- 2 cups old-fashioned rolled oats: These provide the hearty, chewy base with great gluten-free crunch.
- ½ cup almond flour: Adds a subtle nutty flavor and helps bind the cups while keeping them tender.
- ½ cup honey or maple syrup: Sweetens naturally and aids in holding the mixture together.
- ¼ cup melted coconut oil: Brings moisture and crispness when baked, with a gentle tropical hint.
- 1 teaspoon vanilla extract: Enhances all the flavors with its warm, aromatic touch.
- ½ teaspoon cinnamon: Adds a cozy spice that complements the sweetness perfectly.
- ¼ teaspoon salt: Balances flavors and deepens the overall taste profile.
- Optional ¼ cup mini chocolate chips or chopped nuts: For those extra bursts of indulgence or crunch.
- Greek yogurt and fresh berries: The creamy and fresh fillings that elevate the granola cups to something truly special.
How to Make Granola Cups with Greek Yogurt and Fresh Berries Recipe
Step 1: Prep Your Oven and Pan
Start by preheating your oven to 350°F (175°C). Grease a 12-cup muffin tin or line it with silicone liners to make sure your granola cups come out easily and maintain their beautiful shape. This step sets the stage for perfect cups that hold together without sticking.
Step 2: Mix the Dry and Wet Ingredients
In a large bowl, combine the rolled oats, almond flour, cinnamon, and salt. Next, add the melted coconut oil, honey or maple syrup, and vanilla extract. Stir everything until the mixture feels sticky and all the ingredients are fully combined. This binding quality is essential to form sturdy cups that don’t crumble.
Step 3: Add Optional Mix-Ins for Extra Flavor
If you want to jazz things up, gently fold in mini chocolate chips or chopped nuts now. These extras bring delightful surprises in every bite without overpowering the wholesome base flavors.
Step 4: Press the Mixture into Cups
Divide the granola mixture evenly among the muffin cups. Press the mixture firmly into the bottom and around the sides of each cup to create a hollow shell shape. The pressure you use here determines how well your cups stick together, so take your time crafting them.
Step 5: Bake to Golden Perfection
Place the muffin tin in your preheated oven and bake for 12 to 15 minutes. You want the granola cups to turn a warm golden brown color, signaling that they are perfectly crisp yet tender. The smell at this point will have you itching to taste already!
Step 6: Cool and Fill
Allow the granola cups to cool completely in the tin before carefully removing them. Cooling is critical because the cups firm up as they cool, helping them hold their shape. Once cool, fill each cup with creamy Greek yogurt and top with colorful fresh berries. This step turns simple cups into a beautiful, fresh, and nutritious treat.
How to Serve Granola Cups with Greek Yogurt and Fresh Berries Recipe

Garnishes
To amp up the visual appeal and flavor, sprinkle a little extra cinnamon, a drizzle of honey, or a few extra chopped nuts on top of the yogurt and berries. Fresh mint leaves also make a charming and fragrant garnish that will wow your guests or family.
Side Dishes
These granola cups pair wonderfully with a light green smoothie or a glass of freshly squeezed orange juice for a balanced and energizing breakfast. They are also fantastic alongside a small bowl of mixed seeds or a fruit salad for a more substantial spread during brunch.
Creative Ways to Present
If you’re hosting a brunch or want to turn these into a delightful dessert, serve the granola cups in clear glass jars or mini parfait glasses for a layered effect. Another idea is to serve them with a side of passion fruit pulp or a splash of homemade berry compote for an extra pop of flavor and color.
Make Ahead and Storage
Storing Leftovers
You can keep your granola cups fresh by storing them in an airtight container at room temperature for up to five days. This makes them an excellent option for meal prepping snacks or breakfasts for the busy week ahead.
Freezing
If you want to extend their shelf life, granola cups freeze beautifully. Place them in a freezer-safe container separated by parchment paper to prevent sticking. When you are ready to enjoy, simply thaw at room temperature for 30 minutes before adding yogurt and berries.
Reheating
Reheat the granola cups in a preheated oven at 325°F (160°C) for about 5 minutes if you want to restore a warm crunch, but only reheat the cups alone—add the yogurt and berries fresh afterward to keep everything deliciously fresh.
FAQs
Can I make these granola cups nut-free?
Absolutely! Swap almond flour for oat flour and replace the coconut oil with sunflower seed butter to keep things free from nuts but still flavorful and sturdy.
How do I keep the granola cups from falling apart?
Press the mixture firmly into your muffin cups and let them cool completely before removing. The honey or maple syrup acts as a natural binder, so ensure your mixture is sticky enough before baking.
Can I use any kind of berries?
Yes! Fresh strawberries, blueberries, raspberries, blackberries, or even a mix of your favorites will make these granola cups pop with flavor and color.
Are these granola cups suitable for breakfast or just snacks?
They are perfect for both! Their balanced nutrients and natural sweetness make them a wholesome breakfast option or a satisfying, kid-friendly snack anytime.
Can I substitute Greek yogurt with a dairy-free option?
If you prefer a dairy-free version, opt for coconut or almond milk yogurt. Just keep in mind it may alter the flavor slightly but still taste delicious.
Final Thoughts
There is nothing quite as satisfying as a homemade treat that is easy, healthy, and makes you smile with every bite. This Granola Cups with Greek Yogurt and Fresh Berries Recipe is exactly that—offering a perfect balance of crunchy, creamy, tangy, and sweet all in one beautiful bite. I encourage you to try it out and watch how it quickly becomes a beloved staple in your breakfast or snack routine. Trust me, your taste buds will thank you!
Print
Granola Cups with Greek Yogurt and Fresh Berries Recipe
- Prep Time: 10 minutes
- Cook Time: 15 minutes
- Total Time: 25 minutes
- Yield: 12 granola cups
- Category: Snack, Breakfast
- Method: Baking
- Cuisine: American
- Diet: Gluten Free, Vegetarian
Description
These Granola Cups are a delicious and healthy snack or breakfast option featuring a crunchy oat and almond flour crust baked to golden perfection. Filled with creamy Greek yogurt and topped with fresh berries, they offer a balanced combo of textures and flavors perfect for a kid-friendly, gluten-free treat.
Ingredients
Granola Cup Base
- 2 cups old-fashioned rolled oats
- ½ cup almond flour
- ½ cup honey or maple syrup
- ¼ cup melted coconut oil
- 1 teaspoon vanilla extract
- ½ teaspoon cinnamon
- ¼ teaspoon salt
- Optional: ¼ cup mini chocolate chips or chopped nuts
Filling & Toppings
- Greek yogurt
- Fresh berries of choice
Instructions
- Preheat and prepare pan: Preheat your oven to 350°F (175°C). Grease a 12-cup muffin tin or line it with silicone liners to prevent sticking.
- Mix dry and wet ingredients: In a large bowl, combine the rolled oats, almond flour, honey or maple syrup, melted coconut oil, vanilla extract, cinnamon, and salt. Stir until the mixture is uniformly sticky and well incorporated.
- Add optional mix-ins: If desired, fold in mini chocolate chips or chopped nuts evenly into the granola mixture for added texture and flavor.
- Shape granola cups: Divide the granola mixture evenly among the muffin cups. Press firmly on the bottom and up the sides of each cup to create a hollow cup shape that will hold the filling.
- Bake: Place the muffin tin in the preheated oven and bake for 12 to 15 minutes, or until the granola cups turn a beautiful golden brown color.
- Cool and remove: Allow the granola cups to cool completely inside the tin so they firm up. Carefully remove each cup from the tin without breaking.
- Fill and serve: Just before serving, fill each granola cup with creamy Greek yogurt and top with fresh berries or other favorite toppings for a delicious, nutritious treat.
Notes
- Store granola cups in an airtight container at room temperature for up to 5 days.
- For a nut-free variation, substitute oat flour for almond flour and use sunflower seed butter instead of coconut oil.
- Be sure to press the mixture firmly into the muffin cups to help the cups hold their shape after baking.
- This recipe is easily customizable—try different mix-ins like dried fruit or seeds.
