
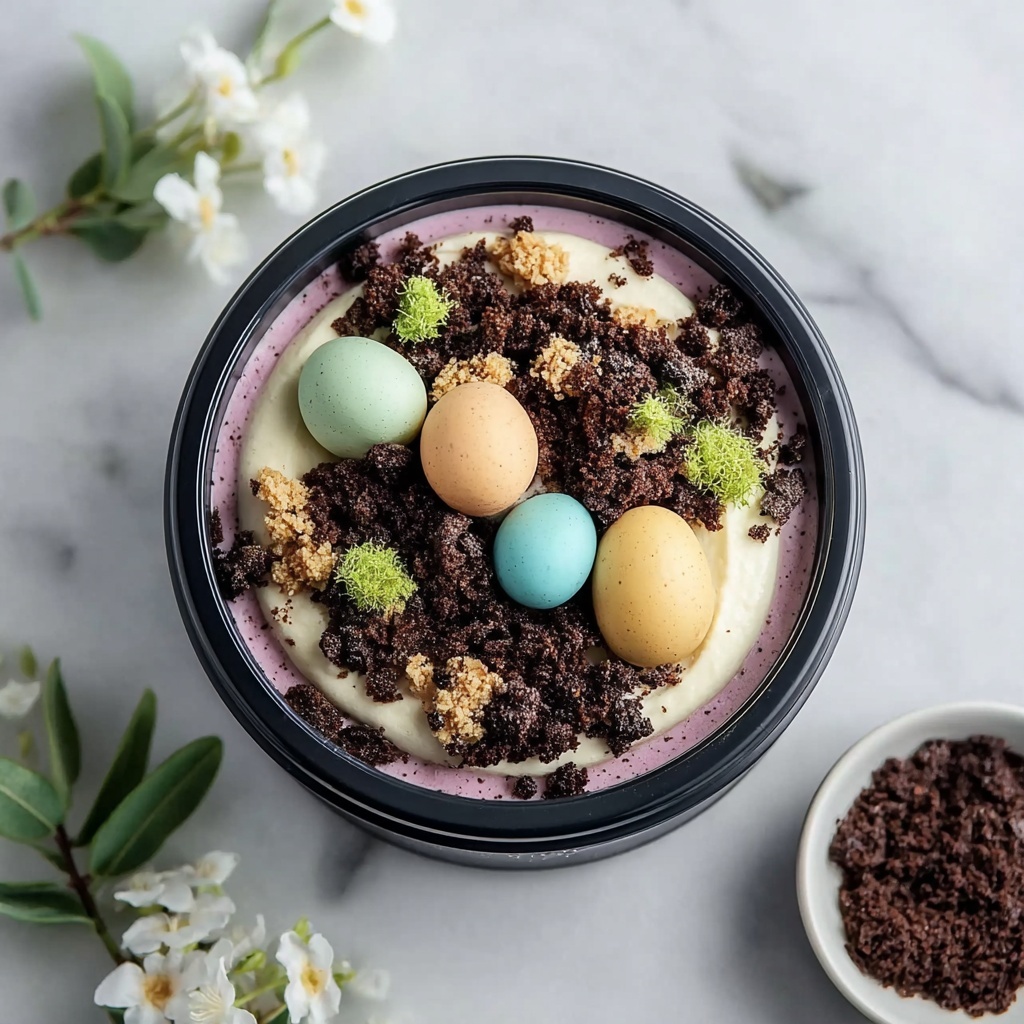
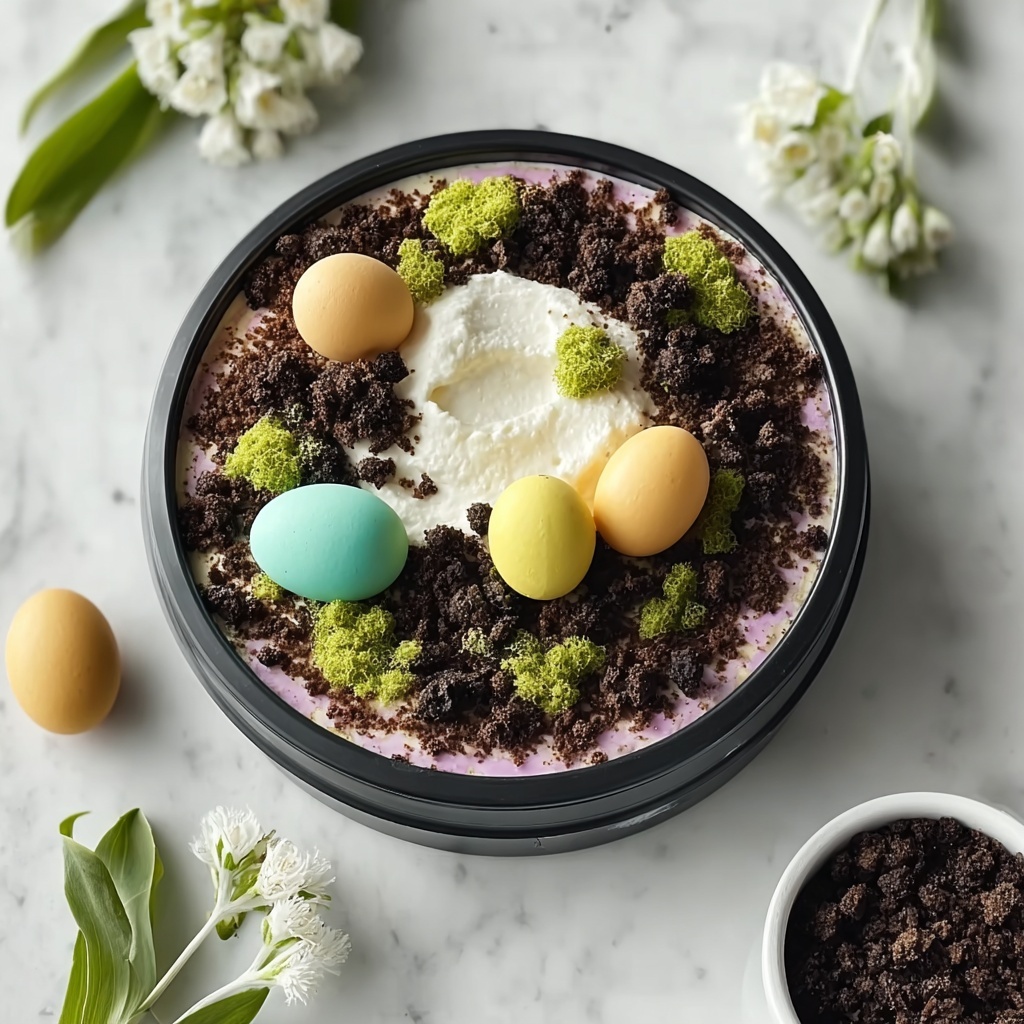
If you are looking for a festive, fun, and utterly delicious dessert that captures the playful spirit of spring, the Easter Pudding Dirt Cups Recipe is just what you need. These whimsical treats combine creamy chocolate pudding with crunchy cookie crumbs and gummy worms, creating a delightful contrast of textures and flavors. Whether for a family gathering, a holiday party, or just a special treat to brighten your day, this recipe brings a charming presentation and easy-to-follow steps that will make you look like a dessert pro in no time.
Ingredients You’ll Need
The beauty of the Easter Pudding Dirt Cups Recipe lies in its simplicity and how each ingredient plays a key role in building layers of flavor and texture. All of these essentials are easy to find and come together quickly to create an impressive dessert.
- Chocolate pudding mix: The creamy base that brings rich chocolate flavor and smooth texture to the cups.
- Milk: Used to prepare the pudding, helping it achieve the perfect consistency.
- Chocolate sandwich cookies: Crushed to mimic dirt, adding a satisfying crunch and deep chocolate notes.
- Whipped topping: Lightens the pudding mixture and adds a fluffy, airy touch for contrast.
- Gummy worms: The playful garnish that makes the dirt cups so charming and festive.
- Powdered sugar: Sweetens the whipped topping blend with a smooth finish.
- Vanilla extract: Adds warmth and depth to the creamy topping mixture.
How to Make Easter Pudding Dirt Cups Recipe
Step 1: Prepare the Chocolate Pudding
Start by whisking together the chocolate pudding mix with 2 cups of milk in a medium-sized bowl. Keep stirring for about 2 minutes until the mixture thickens to that perfect pudding-like consistency. This step ensures your pudding base is silky smooth and rich.
Step 2: Chill the Pudding
After your pudding thickens, pop it into the refrigerator to chill for at least 5 minutes. Chilling helps the pudding set slightly, which will make assembling your dirt cups easier and prevents them from becoming too runny.
Step 3: Crush the Cookies
While the pudding chills, place your chocolate sandwich cookies in a large resealable plastic bag. Use a rolling pin or another heavy object to crush the cookies into fine crumbs that resemble dirt. The crumbly texture is essential for building the layers and enhancing the “dirt” illusion.
Step 4: Make the Whipped Topping Mixture
In a separate large bowl, combine the whipped topping, powdered sugar, and vanilla extract. Stir gently until everything is smooth and well-blended. This mixture adds a sweet, creamy dimension that balances the richness of the pudding.
Step 5: Combine Pudding and Topping
Once the pudding is chilled, fold the whipped topping mixture into the pudding until fully combined and smooth. The result is a luscious, fluffy base ready for layering.
Step 6: Assemble the Dirt Cups
Grab your serving cups or bowls and start with a spoonful of the pudding mixture at the bottom. Add a layer of your crushed cookie crumbs on top, then repeat the layers, finishing with cookie crumbs for that final dirt effect.
Step 7: Add the Finishing Touches
Top each cup with a few gummy worms, letting them drape over the edge to mimic wriggling creatures in the dirt. This playful detail is what makes the Easter Pudding Dirt Cups Recipe extra fun and festive.
Step 8: Chill Before Serving
Place the assembled cups in the refrigerator for at least one hour. This allows the layers to set properly and the flavors to meld beautifully, ensuring every spoonful tastes just right.
How to Serve Easter Pudding Dirt Cups Recipe
Garnishes
While the classic gummy worms are a must-have for authentic dirt cup fun, feel free to add pastel-colored sprinkles, edible flowers, or tiny chocolate eggs for an extra Easter vibe. These garnishes not only boost the visual appeal but add delightful bursts of texture and sweetness.
Side Dishes
Since Easter Pudding Dirt Cups are rich and indulgent, pairing them with lighter side dishes like fresh fruit salad or a crisp mint lemonade offers a refreshing balance. These sides cleanse the palate and keep the celebration feeling bright and vibrant.
Creative Ways to Present
Try serving the dirt cups in small mason jars or clear plastic cups to showcase the layers beautifully. For a festive touch, tie a pastel ribbon around the cup or use edible markers to personalize each one for guests. Presentation makes the dessert feel even more special and inviting.
Make Ahead and Storage
Storing Leftovers
If you have any leftovers, cover the cups tightly with plastic wrap or transfer the contents to an airtight container. Store them in the refrigerator for up to 2 days to keep the pudding fresh and the cookie crumbs from becoming soggy.
Freezing
This dessert is best enjoyed fresh or chilled, as freezing can affect the texture of the pudding and whipped topping. For best results, avoid freezing the dirt cups to maintain that creamy, smooth consistency.
Reheating
No reheating required here! These Easter Pudding Dirt Cups are always served cold. Simply take them out of the refrigerator and enjoy immediately for the best experience.
FAQs
Can I make this dessert dairy-free?
Absolutely! Use a dairy-free chocolate pudding mix, substitute regular milk with almond or oat milk, and choose a dairy-free whipped topping brand to make this recipe suitable for dairy-free diets.
How long does it take to prepare Easter Pudding Dirt Cups Recipe?
The preparation is surprisingly quick—about 15 minutes prep plus some chilling time. It’s a fantastic dessert to whip up when you want something impressive without spending hours in the kitchen.
Can I use a different type of cookie instead of chocolate sandwich cookies?
Chocolate sandwich cookies work best to simulate “dirt,” but feel free to experiment with crushed chocolate graham crackers or chocolate chip cookies for a unique twist on the classic dirt cup concept.
Are gummy worms necessary?
While gummy worms add the iconic “worm in dirt” look and playful texture, you can substitute them with candy bugs, chocolate chips, or even small pieces of fruit if you prefer something less sweet.
Can this dessert be made gluten-free?
Yes, by using gluten-free chocolate pudding mix and gluten-free cookies, this Easter Pudding Dirt Cups Recipe can be adapted to gluten-free needs without losing its charm or deliciousness.
Final Thoughts
There’s something truly joyful about making and sharing the Easter Pudding Dirt Cups Recipe. It’s a simple, sweet, and festive dessert that brings smiles to faces with every bite. Whether you’re baking for kiddos or just want a fun treat for yourself, these dirt cups are bound to become a beloved tradition. So grab your ingredients, have fun with the layering, and get ready to enjoy a dessert that’s as playful as it is delicious!
Print
Easter Pudding Dirt Cups Recipe
- Prep Time: 0h 15m
- Cook Time: 0h 5m
- Total Time: 1h 20m
- Yield: 6 servings
- Category: Dessert
- Method: No-Cook
- Cuisine: American
Description
Easter Pudding Dirt Cups are a fun and festive dessert featuring layers of creamy chocolate pudding mixed with whipped topping, crumbly chocolate sandwich cookies, and colorful gummy worms for a playful ‘dirt and worms’ effect. Easy to make and perfect for springtime celebrations or kids’ parties, this no-bake treat combines smooth pudding with crunchy cookie crumbs and sweet gummy candies.
Ingredients
Pudding Mixture
- 1 package chocolate pudding mix
- 2 cups milk
Cookie Crumbs
- 1 package chocolate sandwich cookies
Whipped Topping Mixture
- 4 ounces whipped topping
- 1/2 cup powdered sugar
- 1 teaspoon vanilla extract
Toppings
- 1 cup gummy worms
Instructions
- Mix Pudding: In a medium-sized mixing bowl, combine the chocolate pudding mix and 2 cups of milk. Whisk the mixture for about 2 minutes until it thickens to a pudding-like consistency.
- Chill Pudding: Set the thickened pudding aside to chill in the refrigerator for at least 5 minutes, allowing it to firm up a bit.
- Crush Cookies: Place the chocolate sandwich cookies into a large resealable plastic bag. Use a rolling pin or heavy object to crush them into fine crumbs. Set aside.
- Prepare Whipped Mixture: In a separate large mixing bowl, combine the whipped topping, powdered sugar, and vanilla extract. Stir gently until smooth and well blended.
- Combine Mixtures: Once the pudding has chilled, add the whipped topping mixture to it. Stir both together thoroughly until fully combined and smooth.
- Layer Dessert: Spoon a layer of the pudding mixture into the bottom of serving cups or bowls, then top with a layer of crushed cookie crumbs. Repeat layering until cups are filled, finishing with cookie crumbs on top.
- Add Gummy Worms: Place gummy worms decoratively on top of the final cookie layer, letting them drape over the edges for a fun effect.
- Final Chill: Refrigerate the assembled dirt cups for at least 1 hour to allow everything to set properly and flavors to meld.
- Serve: Once chilled, serve the Easter pudding dirt cups as a festive and playful dessert.
Notes
- For best texture, chill the pudding before combining it with the whipped topping mixture.
- Use a sturdy resealable plastic bag and a rolling pin to crush cookies evenly.
- Feel free to substitute gummy worms with other candy for customization.
- Can be assembled a few hours ahead and kept refrigerated until serving.
- Use full-fat milk for creamier pudding or low-fat milk for a lighter version.


