
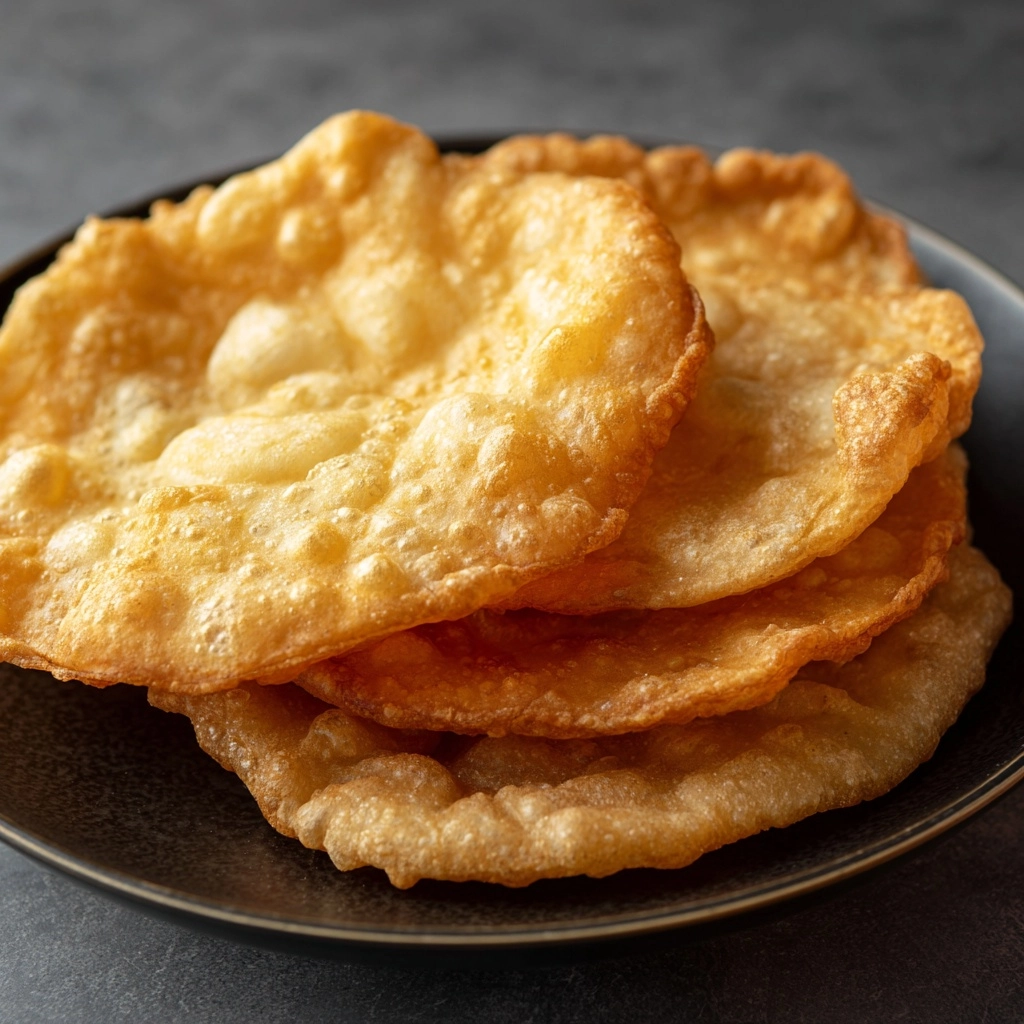
If you have yet to experience the joy of homemade fry bread, this Classic Fry Bread Recipe will truly warm your heart and your kitchen. This Native American staple combines simplicity with exceptional flavor and texture, resulting in a golden, pillowy bread that’s crisp on the outside and tender inside. Whether you enjoy it sweet with honey or savory with taco fillings, this fry bread brings a comforting, rustic charm that makes every bite unforgettable. It’s a delicious way to connect with tradition and share something special with your loved ones.
Ingredients You’ll Need
These few but essential ingredients form the backbone of this wonderful fry bread. Each one plays a unique role in creating the perfect dough that fries up beautifully—springy and golden every time.
- All-purpose flour: The base that gives fry bread its structure and soft crumb.
- Baking powder: Acts as a leavening agent, creating lightness and puffiness in the bread.
- Salt: Just a pinch enhances all the flavors and balances the dough.
- Warm water: Activates the baking powder and brings the dough together smoothly.
- Vegetable oil: For frying, providing that irresistible crispy exterior and golden color.
How to Make Classic Fry Bread Recipe
Step 1: Mix the Dry Ingredients
Start by whisking together the flour, baking powder, and salt in a large bowl. This ensures the rising agent is evenly distributed throughout the dough, setting the stage for a light fry bread that bubbles beautifully in the oil.
Step 2: Form the Dough
Gradually add warm water to your dry mix while stirring with your hand or a spoon. The goal is a soft, slightly sticky dough that isn’t wet or dry. Adjust with extra flour or water as needed. This part feels a little like playing with clay, forming the base for your soon-to-be golden delights.
Step 3: Knead and Rest
Turn the dough out onto a floured surface and knead gently for 3 to 4 minutes until it’s smooth and elastic. Resist the urge to over-knead—it should feel tender but hold together beautifully. Cover with a towel and let the dough rest for 30 minutes; this allows the gluten to relax, which helps the bread puff up perfectly when fried.
Step 4: Shape Into Disks
Divide the dough into four equal pieces and shape each into a ball. Then carefully flatten them with your hands or rolling pin until they’re about a quarter inch thick. The thickness is key, making sure you get a soft center without sogginess.
Step 5: Heat Oil and Fry
Heat about an inch of vegetable oil in a sturdy skillet on medium-high heat. A quick test to know the oil is ready: drop in a small piece of dough, and if it sizzles immediately, you’re good to go. Fry each disk for about 1 to 2 minutes on each side until golden brown and puffed like little pillows of joy.
Step 6: Drain and Serve Warm
Use tongs to carefully remove the fry bread and let it drain on paper towels to shed excess oil. Serve warm for the best taste and texture, ready to be dressed up however you desire.
How to Serve Classic Fry Bread Recipe

Garnishes
One of the best things about this Classic Fry Bread Recipe is its versatility. Top your fry bread with melted butter and a sprinkle of cinnamon sugar for a sweet treat, or drizzle honey for stickier goodness. For a savory twist, a sprinkle of salt or a dollop of sour cream adds richness that complements the crispy surface.
Side Dishes
Fry bread pairs wonderfully with hearty sides such as chili or beans, making it a perfect plate companion. It also serves well alongside fresh salads or spicy salsas, offering a contrast between crunchy bread and the freshness of your sides. It’s a marvelous way to round out any meal.
Creative Ways to Present
Get creative and turn your fry bread into taco shells for Indian tacos, layering them with seasoned ground meat, lettuce, cheese, and tomatoes for an irresistible handheld feast. Alternatively, try folding fry bread with fillings like jam or cream cheese for a delightful snack. The possibilities are as endless as your imagination!
Make Ahead and Storage
Storing Leftovers
If you happen to have any fry bread left (which is rare!), store it in an airtight container at room temperature. It stays fresh for up to two days but is undoubtedly best when eaten warm and fresh.
Freezing
Fry bread freezes beautifully! Stack the cooled pieces separated with parchment paper, then seal in a freezer bag. They’ll maintain their texture for up to a month, perfect for quick snacks or last-minute meals.
Reheating
Reheat frozen or leftover fry bread in a hot skillet for a minute on each side or pop them in a toaster oven. Avoid microwaving as it tends to make the bread chewy rather than crisp and tender.
FAQs
Can I use whole wheat flour instead of all-purpose flour?
Absolutely! Whole wheat flour can add a nutty flavor and more fiber, but expect slightly denser fry bread. You might want to adjust the water slightly to get the right dough consistency.
Why is my fry bread not puffing up?
Make sure your dough rested properly and the oil is hot enough before frying. Also, avoid rolling the dough too thin or overworking it, as that can prevent the bread from puffing fully.
Can I bake this bread instead of frying it?
While this recipe is designed for frying to achieve the signature crispy exterior, you can bake it, but the texture and flavor will differ significantly. Frying is essential for the authentic experience.
What are some traditional toppings for fry bread?
Traditional toppings range from sweet options like powdered sugar and honey to savory ones like taco meat, beans, cheese, and lettuce—perfect for making Indian tacos.
Is this Classic Fry Bread Recipe suitable for vegetarians?
Yes, this recipe is vegetarian-friendly since it contains no animal products. It’s a versatile bread that can be paired with many vegetarian or vegan toppings as well.
Final Thoughts
I hope you feel excited to try this Classic Fry Bread Recipe, a humble yet incredibly satisfying dish that’s easy to make and perfect for sharing. Fry bread brings a touch of tradition and so much joy to the table. Once you master these simple steps, you’ll find yourself reaching for fry bread as a delicious addition to your meals or a sweet snack. So roll up your sleeves and dive into the comforting world of homemade fry bread—it’s truly a kitchen adventure worth having.
Print
Classic Fry Bread Recipe
- Prep Time: 35 minutes
- Cook Time: 10 minutes
- Total Time: 45 minutes
- Yield: 4 fry breads
- Category: Bread
- Method: Frying
- Cuisine: Native American
- Diet: Vegetarian
Description
This Classic Fry Bread Recipe offers a traditional Native American delight that’s crispy on the outside and soft on the inside. Made with simple pantry staples like flour, baking powder, and warm water, this fry bread is fried to golden perfection and perfect for sweet or savory toppings. Its straightforward preparation and quick fry time make it an ideal choice for an authentic homemade treat.
Ingredients
Dry Ingredients
- 2 cups all-purpose flour
- 1 tablespoon baking powder
- 1/2 teaspoon salt
Wet Ingredients
- 3/4 cup warm water
For Frying
- Vegetable oil, for frying (about 1 inch depth)
Instructions
- Mix Dry Ingredients: In a large bowl, whisk together the all-purpose flour, baking powder, and salt to ensure even distribution of the leavening agent and seasoning.
- Add Water and Form Dough: Gradually add the warm water while mixing with your hand or a spoon until a soft dough forms. Adjust by adding more flour if too sticky or more water if too dry.
- Knead the Dough: On a floured surface, gently knead the dough for 3-4 minutes until smooth, being careful not to overwork it to keep the bread tender.
- Rest the Dough: Cover the dough with a clean towel and let it rest for 30 minutes. This resting period helps the gluten relax, resulting in soft, fluffy bread.
- Divide and Shape: Divide the rested dough into 4 equal pieces. Shape each piece into a ball and then flatten each into a disk approximately 1/4 inch thick using your hands or a rolling pin.
- Heat Oil: In a deep skillet, heat about 1 inch of vegetable oil over medium-high heat. Test readiness by dropping a small piece of dough; it should sizzle immediately.
- Fry the Bread: Carefully place one dough disk into the hot oil. Fry for 1-2 minutes on each side, or until the bread is golden brown and puffed.
- Drain and Serve: Remove the fry bread with tongs and drain on a paper towel-lined plate. Repeat frying with the remaining dough pieces. Serve warm with your choice of honey, powdered sugar, or savory toppings.
Notes
- Fry bread can be served sweet with toppings like cinnamon sugar or savory with taco fillings.
- Resting the dough is key to achieving soft, fluffy results.
- Avoid over-kneading to keep the bread tender and light.

