
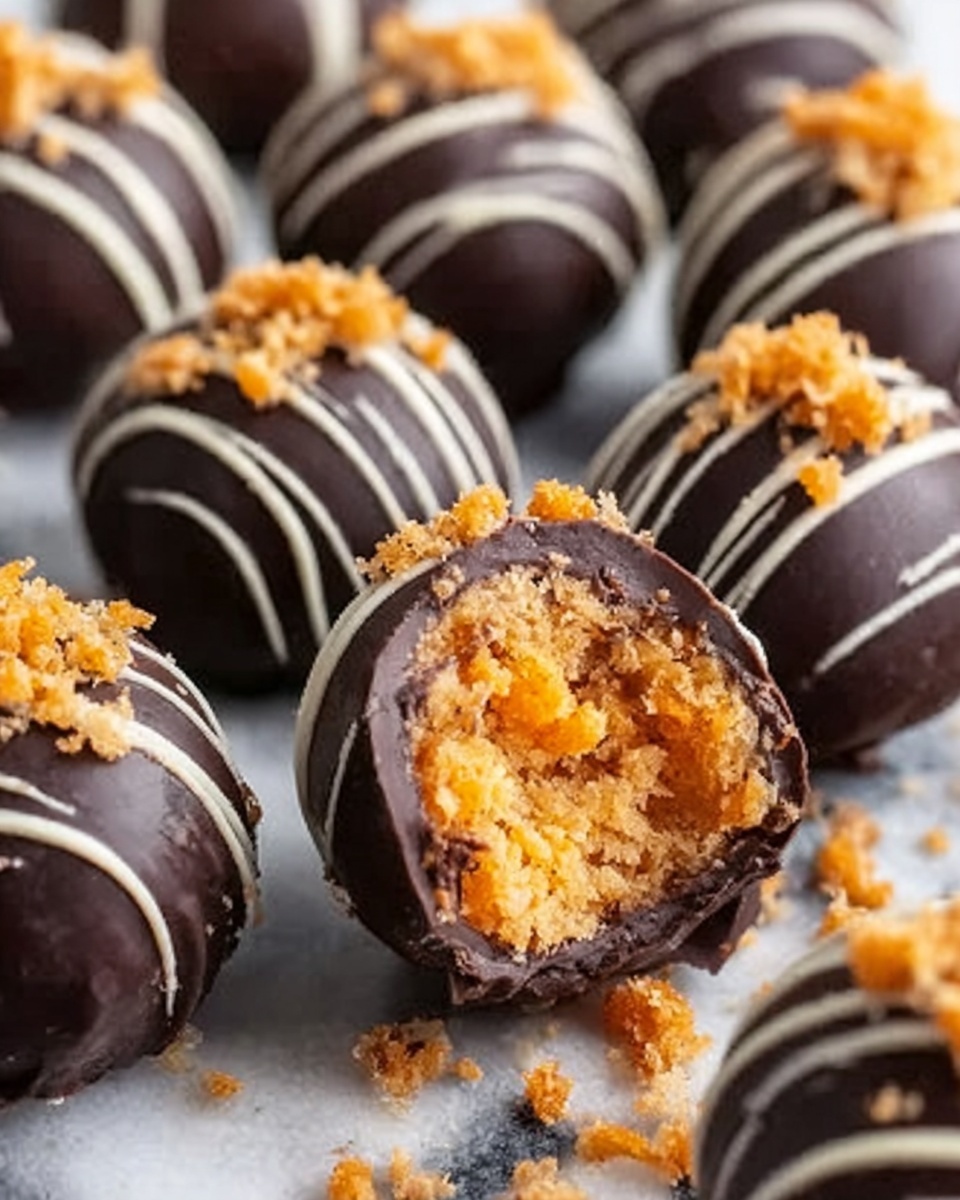
If you have a sweet tooth and love bite-sized treats that deliver a crunch with every mouthful, the Butterfinger Balls Recipe is an absolute game-changer. These delightful little spheres pack the irresistible flavor of Butterfinger bars wrapped in a rich blend of peanut butter, graham crackers, and powdered sugar, all coated in a smooth chocolate shell. Preparing this recipe will soon become your favorite way to impress friends and family with something both nostalgic and wonderfully indulgent.

Ingredients You’ll Need
The magic behind this Butterfinger Balls Recipe lies in its simple yet perfectly balanced ingredients. Each one plays a crucial role, whether it’s the buttery texture, the nutty depth, or that signature crispy crunch.
- Powdered sugar: Adds sweetness and helps bind the mixture together with a smooth texture.
- Graham cracker crumbs: Provide a subtle hint of honeyed crunch that balances the richness.
- Butterfinger bars, crushed: The star ingredient delivering that unique crispy, peanut-buttery candy flavor.
- Butter, melted: Brings moisture and richness, making the mixture easy to shape.
- Crunchy peanut butter: Delivers a creamy nutty punch and complements the Butterfinger bars perfectly.
- Chocolate almond bark or candy coating: Creates a glossy, firm shell that encases the balls in irresistible chocolatey goodness.
How to Make Butterfinger Balls Recipe
Step 1: Mix the Ingredients
Start by gathering all your ingredients to ensure a smooth process. In a large mixing bowl, combine the powdered sugar, graham cracker crumbs, crushed Butterfinger bars, melted butter, and crunchy peanut butter. Stir everything together until the mixture is evenly incorporated and sticky enough to hold its shape. This is where the magic begins, blending textures and flavors into one harmonious base.
Step 2: Form the Balls
Now, it’s time to get your hands a little messy! Using your hands, roll the mixture into small, 1-inch balls. This size makes them perfectly bite-sized and easy to dip later on. Place each ball on a baking sheet lined with parchment paper. This step preps them for chilling, which helps firm them up for the next stages.
Step 3: Chill the Mixture
Pop the balls into the refrigerator for at least 30 minutes. This chilling period is essential to let everything set nicely so the balls don’t fall apart when dipped in chocolate. It’s a great time to clean up or prepare your workspace for the coating process.
Step 4: Melt the Chocolate
While your Butterfinger balls rest, melt the chocolate almond bark or your chosen candy coating according to the package instructions. Using a smooth, melted chocolate will give your treats a perfect glossy finish and a satisfying snap when bitten.
Step 5: Dip the Balls
Carefully dip each chilled ball into the melted chocolate, making sure it’s fully coated for a beautiful finish. Allow any excess chocolate to drip off before placing them back onto the parchment-lined sheet. Handling them gently will keep their round shape intact.
Step 6: Let the Chocolate Set
Finally, let the chocolate-coated Butterfinger balls set completely, either at room temperature or by placing them briefly in the fridge. Once firm, they’re ready to serve or store for later enjoyment.
How to Serve Butterfinger Balls Recipe
Garnishes
To take your Butterfinger Balls Recipe to the next level, consider sprinkling a tiny pinch of crushed Butterfinger pieces or chopped peanuts on top before the chocolate sets. This adds a decorative touch and an extra layer of crunch that’s sure to wow anyone you share them with.
Side Dishes
These Butterfinger balls pair wonderfully with a cold glass of milk, coffee, or even a scoop of vanilla ice cream for a decadent dessert duo. They’re also fantastic alongside fresh berries to cut through their sweetness with a little tartness.
Creative Ways to Present
Serve your Butterfinger balls in small paper cupcake liners or arrange them on a tiered dessert platter for parties. Wrapping them individually in cellophane with a festive ribbon transforms them into adorable edible gifts perfect for holidays or special occasions.
Make Ahead and Storage
Storing Leftovers
You can keep leftover Butterfinger balls in an airtight container in the refrigerator for up to one week. This keeps them fresh and maintains the crispness of both the filling and the chocolate shell.
Freezing
For longer storage, freeze the Butterfinger balls in a single layer on a baking sheet first until solid, then transfer them to a freezer-safe container or bag. They freeze beautifully for up to three months without losing their texture or flavor.
Reheating
When ready to enjoy frozen Butterfinger balls, simply thaw them in the refrigerator overnight. Avoid microwaving as it can melt the chocolate unevenly and affect the texture. Enjoy them cold or at room temperature for best taste.
FAQs
Can I use creamy peanut butter instead of crunchy?
Absolutely! Creamy peanut butter will work well and give a smoother texture, though the crunch adds a nice contrast that complements the Butterfinger bits.
What if I can’t find chocolate almond bark?
You can substitute with any good-quality chocolate candy coating or melting chocolate. Just make sure it melts smoothly and hardens nicely for that perfect finish.
How long do Butterfinger Balls last?
Stored properly in the fridge, these treats last about one week, perfect for enjoying over several days or sharing with friends.
Can I make the mixture in advance before rolling into balls?
Yes, you can prepare the mixture and refrigerate it for a few hours or overnight to make rolling easier, especially if your kitchen is warm.
Is there a way to make this recipe nut-free?
This recipe heavily relies on peanut butter and Butterfinger bars which contain peanuts, so it’s not suitable for nut-free diets. You might try substituting with sunflower seed butter and nut-free candy bars, but flavor and texture will vary.
Final Thoughts
If you’re looking for a treat that’s easy to make, irresistibly delicious, and perfect for sharing, I can’t recommend the Butterfinger Balls Recipe enough! It’s a guaranteed crowd-pleaser that brings those classic flavors into a fun, bite-sized form. Give it a try and watch how quickly these sweet balls disappear from your plate—you might just find a new favorite go-to dessert.
Print
Butterfinger Balls Recipe
- Prep Time: 15 minutes
- Cook Time: 0 minutes
- Total Time: 45 minutes
- Yield: 40 servings
- Category: Dessert
- Method: No-Cook
- Cuisine: American
Description
Butterfinger Balls are a delightful no-bake treat featuring a rich blend of crushed Butterfinger bars, creamy peanut butter, and graham cracker crumbs, all coated in smooth melted chocolate. Perfect for parties or a sweet snack, these bite-sized balls offer a crunchy, chocolatey indulgence that’s easy to prepare and sure to impress.
Ingredients
Dry Ingredients
- 1 (16-oz) box powdered sugar
- 2½ cups graham cracker crumbs
- 5 (1.9-oz) Butterfinger bars, crushed
Wet Ingredients
- 1¼ cups butter, melted
- 1½ cups crunchy peanut butter
Coating
- 1 (24-oz) package chocolate almond bark or preferred chocolate candy coating
Instructions
- Mix Ingredients: In a large bowl, thoroughly combine the powdered sugar, graham cracker crumbs, crushed Butterfinger bars, melted butter, and crunchy peanut butter. Stir until the mixture is smooth and well blended.
- Form Balls: Using your hands or a small scoop, roll the mixture into 1-inch diameter balls. Place each formed ball onto a baking sheet lined with parchment paper to prevent sticking.
- Chill: Refrigerate the prepared balls for 30 minutes to allow them to firm up, making them easier to handle for coating.
- Melt Chocolate: While the balls are chilling, melt the chocolate almond bark or your preferred chocolate candy coating according to the package instructions, ensuring a smooth, glossy consistency.
- Dip Balls: Once chilled, dip each ball individually into the melted chocolate, using a fork or dipping tool to coat completely. Lift and gently shake off excess chocolate before placing back onto parchment paper-lined sheet.
- Set Chocolate: Allow the chocolate coating to set at room temperature or place the tray back into the refrigerator briefly until the chocolate hardens completely, sealing in the delicious centers.
Notes
- For a richer flavor, use natural crunchy peanut butter without added sugars.
- Store the Butterfinger balls in an airtight container in the refrigerator for up to one week.
- You can use semi-sweet or milk chocolate in place of almond bark if preferred.
- Chilling the balls before dipping helps prevent them from falling apart during coating.
- These are perfect for holiday treats, parties, or as a gift idea.


