
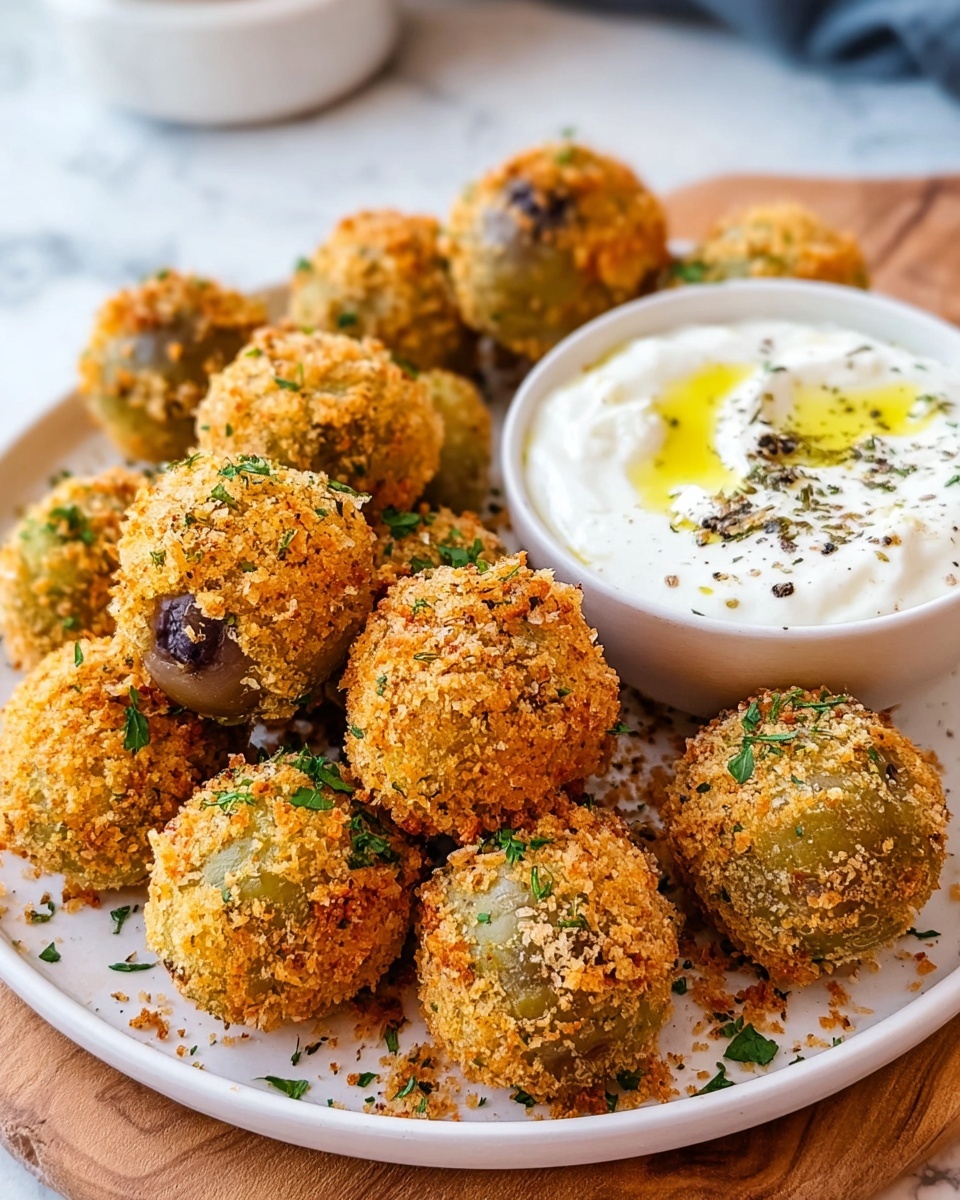
If you love vibrant, crunchy bites that awaken your taste buds, then you’re absolutely going to adore this Fried Olives with Garlic Aioli Recipe. Imagine perfectly crisp, golden-fried green olives bursting with savory goodness, paired with a luscious, garlicky aioli that adds just the right zing. This dish is a delightful twist on a classic snack, blending textures and flavors that’ll have you reaching for more with every dip. Whether you’re entertaining guests or simply craving a gourmet snack, this recipe will quickly become your go-to favorite.

Ingredients You’ll Need
Getting ready to make these irresistible fried olives is a breeze because it all starts with simple, everyday ingredients. Each one plays an essential role in creating that perfect balance of crunchy, savory, and creamy flavors that make this dish shine.
- Green olives, pitted: The star of the show, these bring a salty, slightly tangy base that’s perfect for frying.
- All-purpose flour: Helps the coating stick and gives that initial light crunch.
- Large eggs: Act as the glue for the breadcrumb coating, ensuring each olive is fully covered.
- Panko breadcrumbs: Provide an airy, extra crispy texture that’s divine.
- Grated Parmesan cheese: Adds a subtle umami kick and golden color to the crust.
- Salt and pepper: Essential for seasoning both the coating and aioli to balance flavors.
- Vegetable oil: Perfect for frying, it creates that irresistible golden crust without overpowering taste.
- Mayonnaise: The creamy base of the aioli, it smooths out the bold garlic tones.
- Fresh garlic, minced: Infuses the aioli with savory punch that complements the olives wonderfully.
- Lemon juice: Brightens the aioli with a tangy freshness.
- Dijon mustard: Lends a little warmth and complexity to the dipping sauce.
How to Make Fried Olives with Garlic Aioli Recipe
Step 1: Prepare the Olives
Start by draining the olives thoroughly and patting them dry with paper towels. This little step is crucial because excess moisture can make the coating soggy and cause oil splatters while frying, so take your time to get them as dry as possible.
Step 2: Set Up Your Breading Stations
In a shallow bowl, mix the flour with salt and pepper, creating your first coating layer. In the next bowl, beat the eggs until smooth—the perfect sticky binder. For your third bowl, combine panko breadcrumbs with grated Parmesan cheese. This combination will give you a crispy, flavorful crust full of texture and a slight cheesy hint.
Step 3: Bread the Olives
Now it’s time for the fun part. Dredge each olive in the flour mixture first, making sure it’s lightly coated. Then dip it into the beaten eggs, allowing the coating to adhere well. Finally, roll the olives generously in the panko and Parmesan mixture, ensuring every inch is covered with those crispy breadcrumbs.
Step 4: Fry to Golden Perfection
Heat your vegetable oil over medium-high until it’s hot enough to sizzle a breadcrumb gently. You want enough oil so that the olives can be partially submerged for even cooking. Fry them in batches for about 2 to 3 minutes, turning occasionally until they achieve a gorgeous golden brown and are perfectly crisp. Use a slotted spoon to remove them and drain on paper towels to remove excess oil.
Step 5: Make the Garlic Aioli
While the olives are frying, whip up the garlic aioli by combining mayonnaise, minced garlic, lemon juice, Dijon mustard, and a pinch of salt and pepper. Give it a good stir until smooth and velvety. The zesty garlic aioli is what truly elevates this recipe, balancing crispy fried goodness with creamy, tangy flavor.
How to Serve Fried Olives with Garlic Aioli Recipe
Garnishes
Sprinkle some freshly chopped parsley or a light dusting of Parmesan cheese over the fried olives right before serving. Not only does this add a pop of color, but it also enhances the fresh herbal notes, making every bite shine.
Side Dishes
This dish pairs wonderfully with light, fresh sides such as a simple arugula salad dressed with lemon vinaigrette or a crisp cucumber and tomato salad. These cleanse the palate and complement the rich fried olives without overwhelming them.
Creative Ways to Present
Try serving these delightful morsels on a rustic wooden board alongside small cups of garlic aioli for dipping. For a fanciful touch, you can thread a few fried olives onto toothpicks with cubes of cheese or cherry tomatoes for a charming appetizer platter that’s sure to impress.
Make Ahead and Storage
Storing Leftovers
If you have any leftovers, place the fried olives in an airtight container and store them in the refrigerator. They will remain good for up to 2 days but are best enjoyed fresh for maximum crunch.
Freezing
While freezing fried olives isn’t ideal because it can affect their crisp texture, you can freeze them in a single layer on a baking sheet, then transfer to a zip-top bag. Freeze for up to one month and reheat directly from frozen to help retain a bit of their crunch.
Reheating
To bring back that irresistible crispness, reheat the olives in a preheated oven or air fryer at 375°F (190°C) for about 5 to 7 minutes. Avoid microwaving since it tends to make them soggy and less enjoyable.
FAQs
Can I use black olives instead of green olives?
While green olives are traditional for this recipe because of their firm texture and tangy flavor, you can experiment with black olives. Just be aware they are usually softer and less tangy, which might slightly alter the overall taste and crunch.
Is the garlic aioli difficult to make from scratch?
Not at all! This recipe uses mayonnaise as a base, which makes it quick and simple to whisk up. Fresh garlic and lemon juice add real depth without any complicated steps.
Can I bake the olives instead of frying?
Yes, baking is an option if you’re looking for a lighter alternative. Coat the olives as usual and bake them on a greased sheet at 400°F (200°C) for around 10 to 15 minutes, turning halfway through until golden and crisp.
What type of oil is best for frying olives?
Vegetable oil is recommended here because of its neutral flavor and high smoke point. Other neutral oils like canola or peanut oil also work well for frying with a crisp result.
How long does the garlic aioli keep?
The garlic aioli can be stored in an airtight container in the fridge for up to 3 days. Make sure to give it a good stir before serving if separation occurs.
Final Thoughts
You simply must try this Fried Olives with Garlic Aioli Recipe the next time you want a snack or appetizer that feels both indulgent and surprisingly easy. The combination of crunchy, salty fried olives with that creamy, flavorful aioli is a match made in heaven. Once you experience the joy of these crispy bites dipped in garlicky goodness, I promise they’ll quickly earn a permanent spot on your recipe list and party menus. Enjoy every delicious nibble!
Print
Fried Olives with Garlic Aioli Recipe
- Prep Time: 10 minutes
- Cook Time: 15 minutes
- Total Time: 25 minutes
- Yield: 4 servings
- Category: Appetizer
- Method: Frying
- Cuisine: Mediterranean
- Diet: Vegetarian
Description
Crispy fried olives coated in a golden panko and Parmesan crust, served with a flavorful homemade garlic aioli for dipping. This appetizer combines the salty bite of green olives with a crunchy exterior and creamy garlic dip, perfect for entertaining or a tasty snack.
Ingredients
Fried Olives
- 1 jar green olives, pitted (about 15 oz)
- 1 cup all-purpose flour
- 2 large eggs
- 1 cup panko breadcrumbs
- 1/4 cup grated Parmesan cheese
- Salt and pepper to taste
- Vegetable oil, for frying
Garlic Aioli
- 1/2 cup mayonnaise
- 2 cloves garlic, minced
- 1 tablespoon lemon juice
- 1 teaspoon Dijon mustard
- Salt and pepper to taste
Instructions
- Prepare the olives: Drain the olives thoroughly and pat them dry using paper towels to remove excess moisture, which helps the coating adhere better and prevents oil splatter during frying.
- Mix the flour seasoning: In a shallow bowl, whisk together the all-purpose flour, salt, and pepper. This seasoned flour will provide the initial coating for the olives.
- Beat the eggs: In a second shallow bowl, beat the two large eggs until smooth to create the binding layer between the flour and breadcrumb coatings.
- Combine breadcrumbs and cheese: In a third shallow bowl, mix the panko breadcrumbs with the grated Parmesan cheese to create a flavorful, crunchy outer crust.
- Heat the oil: Pour vegetable oil into a deep skillet or frying pan to a depth sufficient to submerge the olives halfway. Heat over medium-high heat until the oil reaches 350°F (175°C) or is hot enough to sizzle a breadcrumb on contact.
- Coat the olives: Dredge each olive first in the seasoned flour mixture, then dip into the beaten eggs, and finally coat thoroughly with the panko and Parmesan breadcrumb mixture.
- Fry the olives: Carefully fry the coated olives in batches, cooking each batch for 2 to 3 minutes or until the olives turn golden brown and crispy. Use a slotted spoon to remove them from the oil and transfer to a paper towel-lined plate to drain excess oil.
- Prepare the garlic aioli: While the olives fry, combine the mayonnaise, minced garlic, lemon juice, Dijon mustard, salt, and pepper in a small bowl. Mix well until smooth and flavorful.
- Serve: Plate the crispy fried olives alongside the garlic aioli for dipping and enjoy immediately for the best texture and flavor.
Notes
- Ensure olives are thoroughly dried to prevent oil splatter and to help coatings stick.
- Use a thermometer to maintain oil temperature around 350°F for optimal crispiness without absorbing excess oil.
- Frying in small batches prevents lowering the oil temperature, ensuring even cooking.
- Leftover garlic aioli can be refrigerated for up to 3 days.
- For a spicier aioli, add a pinch of cayenne pepper or a dash of hot sauce.


