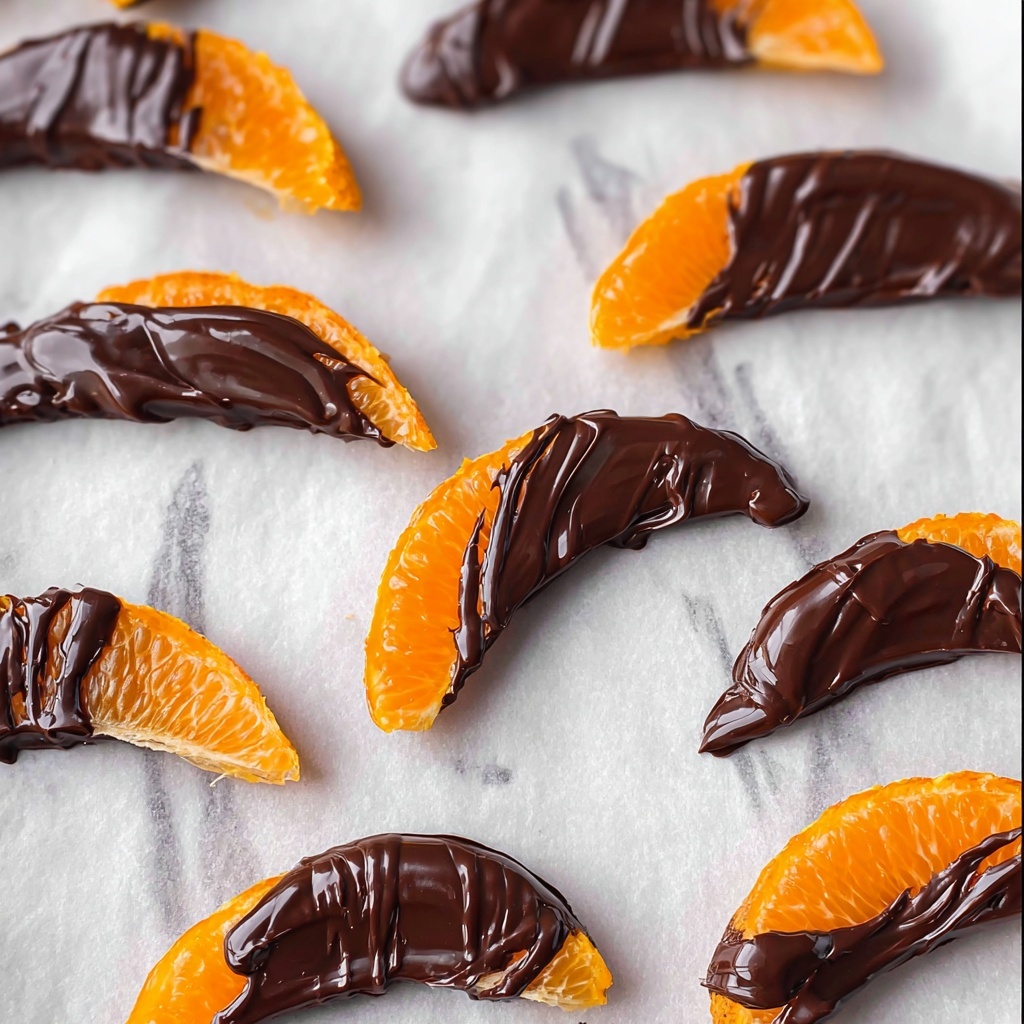
If you adore the sweet yet tangy burst of citrus combined with the rich, velvety smoothness of chocolate, then you are going to fall in love with this Chocolate Covered Citrus Peels Recipe. It takes simple fruit peels and transforms them into little gourmet treats that are both refreshing and indulgent. These candied citrus strips dipped in luscious dark chocolate create a perfectly balanced snack or dessert that’s surprisingly easy to make at home. Whether you’re looking for a unique gift or a fun project to brighten your kitchen, this recipe will quickly become a cherished delight.

Ingredients You’ll Need
The star ingredients in this Chocolate Covered Citrus Peels Recipe are wonderfully straightforward, yet each plays a crucial role in the final taste and texture. From fresh citrus providing zing and brightness to deep, intense dark chocolate adding bittersweet notes, these ingredients come together to make magic happen.
- 5 clementines: Their sweet, delicate flavor and thin peels make for perfect candying.
- 1 grapefruit: Adds a slightly bitter depth and lovely color contrast.
- 1 cup sugar: Essential for turning the peels into that irresistible chewy candy texture.
- 5 ounces dark chocolate: Use good quality for smooth melting and that perfect bittersweet finish.
How to Make Chocolate Covered Citrus Peels Recipe
Step 1: Prepare the Peels
Start by boiling a large pot of water to blanch the citrus peels. This step softens the peels and removes some of the bitterness inherent in the white pith, making your final product both tender and flavorful.
Step 2: Remove the Peels
Slice off the ends of each fruit and gently score each one from top to bottom. Carefully peel off the skins whole, which ensures nice, long strips for candying. This takes a little patience, but the lovely shape of the peels makes it all worthwhile.
Step 3: Cut into Strips
Cut the peels into thin strips about one-quarter of an inch wide. Uniform strips will cook evenly and create a consistent texture when candying and dipping in chocolate.
Step 4: Blanch the Peels Twice
Drop the strips into the boiling water and blanch for 30 seconds. Remove the peels, rinse under cold water, then return them to the boiling water for another 30 seconds. This double blanching helps cut down on bitterness and softens the texture beautifully.
Step 5: Simmer in Sugar Syrup
In a medium saucepan, combine 1 ½ cups water with the cup of sugar over low heat. Add the blanched citrus peels, bringing the mixture to a gentle simmer. Cover and let everything cook together for a full hour. This slow simmer infuses the peels with sweetness while drying them out slightly to the ideal candied consistency.
Step 6: Dry the Peels
Remove the peels from the syrup and arrange them on a rack to dry for 10 to 15 minutes. They should feel slightly hardened on the outside but remain chewy in the center—this texture balance makes the final bite irresistible.
Step 7: Melt the Chocolate
While the peels are drying, melt the dark chocolate gently, using a double boiler or microwave in short bursts to avoid burning. Prepare a large piece of parchment paper ready to catch the dipped peels as they dry.
Step 8: Dip and Dry
Dip each citrus peel strip into the melted chocolate, ensuring an even coating. Lay them out on the parchment to set at room temperature until the chocolate hardens to a smooth, glossy finish.
Step 9: Store for Later Enjoyment
Once the chocolate is fully set, store your chocolate covered citrus peels in an airtight container. You can keep them in the fridge or even the freezer to preserve freshness and keep the chocolate crisp.
How to Serve Chocolate Covered Citrus Peels Recipe

Garnishes
Sprinkle a little flaky sea salt or finely chopped toasted nuts over the chocolate before it hardens for a delightful crunch and an extra layer of flavor. A dusting of cocoa powder or a drizzle of white chocolate creates an elegant look, making these peels perfect for gifting or party trays.
Side Dishes
Chocolate covered citrus peels perfectly complement cheese boards, especially alongside creamy brie or tangy goat cheese. Pair them with a glass of rich red wine or a sparkling cocktail for a sophisticated end to any meal.
Creative Ways to Present
Bundle a handful of peels with a colorful ribbon inside a clear cellophane bag for charming edible gifts. Alternatively, chop them finely and sprinkle over desserts like ice cream, panna cotta, or even homemade baked goods to add a burst of color and flavor.
Make Ahead and Storage
Storing Leftovers
Keep leftover chocolate covered citrus peels in an airtight container at room temperature or in the fridge. Stored properly, they stay deliciously fresh for up to two weeks, making them a fantastic treat to enjoy over time.
Freezing
For longer storage, freezing is a great option. Arrange peels on parchment-lined trays and freeze until solid, then transfer to airtight freezer bags. They’ll keep for up to three months and thaw quickly at room temperature without losing their texture or flavor.
Reheating
Since these peels are best enjoyed as is, reheating is generally unnecessary. However, if the chocolate gets too firm in colder climates, simply let them sit at room temperature for a few minutes to soften up before eating.
FAQs
Can I use other citrus fruits for this Chocolate Covered Citrus Peels Recipe?
Absolutely! Oranges, lemons, limes, and even pomelos work beautifully. Just remember that thicker peels might need a longer blanching and simmering time to soften properly.
What kind of chocolate is best for dipping?
Dark chocolate with at least 60% cocoa content brings the perfect balance of richness and slight bitterness to complement the sweet, tangy peels. But feel free to experiment with milk or white chocolate for different flavors.
Do I have to blanch the peels twice?
Yes, blanching twice helps to reduce bitterness and soften the fibrous pith. Skipping this can result in a peel that tastes too bitter or has a tougher texture.
How long can I keep homemade chocolate covered citrus peels?
Stored in airtight containers, they last up to two weeks in the fridge or freezer for up to three months, making them excellent make-ahead treats.
Can these be made vegan?
Definitely! Just use a high-quality vegan or dairy-free dark chocolate to keep the recipe plant-friendly without sacrificing flavor.
Final Thoughts
This Chocolate Covered Citrus Peels Recipe is one of those special treats that surprise everyone with its bright, vibrant flavor and sophisticated texture. Once you try making these zesty, chocolatey delights at home, you’ll wonder how you ever lived without them. They’re simple, delicious, and a guaranteed crowd-pleaser. So grab those citrus fruits and get ready to make a stunning, homemade candy that you’ll want to share with all your friends.
Print
Chocolate Covered Citrus Peels Recipe
- Prep Time: 30 minutes
- Cook Time: 1 hour
- Total Time: 1 hour 30 minutes
- Yield: 2 servings
- Category: Dessert
- Method: Stovetop
- Cuisine: American
Description
Delightfully tangy and sweet, these Chocolate Covered Citrus Peels combine the bright flavors of clementines and grapefruit with rich dark chocolate. Perfect as a gourmet snack or a unique dessert treat, this recipe walks you through blanching, simmering in sugar syrup, drying, and finally dipping the peels in decadent dark chocolate for an elegant confection.
Ingredients
Produce
- 5 clementines
- 1 grapefruit
Other Ingredients
- 1 cup sugar
- 5 ounces dark chocolate
Instructions
- Boil Water: Bring a large pot of water to a rolling boil to prepare for blanching the citrus peels.
- Prepare Fruit: Slice the ends off the clementines and grapefruit, then score a vertical line down each fruit to carefully remove the peels intact.
- Remove Peels: Gently peel away the skins without breaking them to maintain whole pieces for easier cutting.
- Slice Peels: Cut the removed peels into thin strips, approximately ¼ inch wide, for even cooking and chocolate coating.
- Blanch Peels: Add the peel strips to the boiling water and blanch for 30 seconds. Remove and rinse under cold water. Repeat the blanching process one more time with the same boiling water, then drain and rinse again under cold to stop cooking.
- Simmer in Sugar Syrup: In a medium saucepan, combine 1 ½ cups water with 1 cup sugar over low heat. Add the blanched peels and bring to a gentle simmer. Cover and let simmer for one hour until the peels become tender and infused with sweetness.
- Dry Peels: Remove peels from the syrup and place them on a rack to dry for 10 to 15 minutes until they are slightly hardened and tacky to the touch.
- Melt Chocolate: While the peels dry, melt the dark chocolate gently using a double boiler or microwave in short bursts, stirring often to a smooth consistency. Prepare a large piece of parchment paper for placing dipped peels.
- Dip Peels in Chocolate: Dip each dried peel strip into the melted dark chocolate, coating evenly. Place on parchment paper and allow the chocolate to harden completely.
- Store Properly: Once the chocolate has set, transfer the chocolate-covered citrus peels to an airtight container. Store at room temperature or in the freezer to maintain freshness and texture.
Notes
- Blanching twice helps to remove bitterness from the citrus peels.
- Drying the peels before dipping in chocolate helps the chocolate adhere better and prevents sliding.
- Use dark chocolate with at least 60% cacao for the best balance of bitterness and sweetness.
- These treats can be stored in an airtight container for up to two weeks or frozen for longer storage.
- For added flair, sprinkle a pinch of sea salt on the chocolate before it sets.


